Introduction: Enhancing Allotment Life with Bespoke Storage
For many in the UK, tending to an allotment is more than a hobby—it’s a way of life that blends tradition, community spirit, and a love for hands-on creativity. One of the greatest challenges faced by allotment holders is making the most of compact shed spaces, where every square inch must be thoughtfully utilised. This has given rise to a widespread appreciation for DIY solutions tailored to the unique needs of each gardener. Creating bespoke organisers and storage within your allotment shed not only maximises efficiency but also adds a personal touch that reflects your individual gardening style. Embracing custom storage projects allows you to address clutter, safeguard tools from the British weather, and ensure everything has its place, making daily tasks smoother and more enjoyable. As part of the longstanding British passion for do-it-yourself improvements, investing time in constructing tailored storage solutions transforms your shed into an organised haven that supports both productivity and pleasure throughout the growing season.
Planning Your Storage: Assessing Space and Needs
Before embarking on any DIY project in your allotment shed, it is essential to assess both the available space and your specific gardening requirements. Custom storage should reflect not only the physical dimensions of your shed but also your personal habits and the British climate. Begin by identifying what you need to store—ranging from trowels and secateurs to larger items like watering cans and compost bags—and consider how often you use each item throughout the growing season.
Identify Your Planting Calendar
Your planting calendar serves as a practical guide for organising tools and supplies. For example, seed trays and potting compost are more relevant during early spring, while netting and plant supports become crucial later in the season. Storing these items within easy reach according to their period of use can save time and reduce clutter.
Assessing Tools and Equipment
Take an inventory of all tools, from hand forks to long-handled spades, noting their size, frequency of use, and any special storage needs (such as hanging loops or protection from damp). This is particularly important in the UK, where persistent rain can lead to rust if metal tools aren’t stored properly.
Day-to-Day Requirements Table
| Item Type | Frequency of Use | Ideal Storage Solution | UK Climate Consideration |
|---|---|---|---|
| Hand Tools (trowel, fork) | Daily/Weekly | Wall-mounted rack or magnetic strip | Keep off damp surfaces to prevent rust |
| Seeds & Bulbs | Seasonal | Lidded containers or drawers | Avoid moisture with airtight boxes |
| Pots & Trays | Weekly/Monthly | Shelving units or stackable crates | Raised shelves to avoid water ingress |
| Fertilisers & Chemicals | Occasional | Locked cupboard, out of direct sunlight | Away from children/pets, ensure dry area |
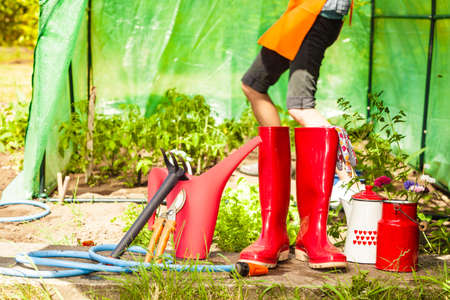
| Protective Gear (gloves, boots) | Daily/Weekly | Shoe rack/hooks near entrance | Allow for ventilation to dry after rain |
This structured approach ensures that every storage solution is bespoke, tailored both to your gardening calendar and the unique demands of British weather. By planning ahead, you maximise space efficiency and keep your allotment shed both functional and tidy throughout the year.
3. Materials and Tools: Sourcing Sustainably
When embarking on DIY projects in your allotment shed, choosing the right materials and tools is crucial for both sustainability and practicality. Traditional British preferences often lean towards reclaimed timber and upcycled materials, which not only reduce environmental impact but also add character and history to your bespoke organisers and storage solutions. Salvaged wood from old pallets, floorboards, or even discarded furniture can be repurposed into shelves, tool racks, or seed storage units, embodying a rustic charm that resonates with the British ethos of making do and mending.
Opting for upcycled materials goes hand-in-hand with cost-consciousness—a value at the heart of many allotment holders. Local charity shops, community scrap stores, and online marketplaces such as Freecycle or Gumtree are excellent sources for finding affordable items that can be given a new lease of life in your shed. By selecting these resources, you not only minimise waste but also contribute to a circular economy within your community.
When it comes to tools, basic hand tools are typically favoured over power tools in traditional British DIY culture. A sturdy hammer, reliable handsaw, set square, screwdriver set, and a tape measure form the backbone of most small-scale building tasks. These tools are readily available at local hardware shops or through second-hand sources, ensuring that your project remains budget-friendly while keeping your carbon footprint low.
By sourcing sustainably and embracing tried-and-tested British practices, you can create functional and environmentally responsible storage solutions tailored specifically to your allotment shed. This approach not only meets practical needs but also reflects a mindful attitude towards resource use—a hallmark of conscientious British gardening.
4. Step-by-Step DIY Projects: From Tool Racks to Seed Boxes
Transforming your allotment shed into a tailored workspace is remarkably achievable with a few practical projects. Below, you’ll find clear instructions for creating modular shelving, a traditional potting bench, and clever vertical storage—all designed to fit the typical UK shed.
Modular Shelving for Versatile Storage
Materials Needed:
| Item | Suggested Size/Type |
|---|---|
| Plywood sheets | 18mm thick, cut to required shelf length |
| Batten timber | 25mm x 38mm, for supports |
| Screws and wall plugs | 40mm wood screws |
| Drill and screwdriver | – |
| Spirit level and tape measure | – |
Instructions:
- Measure your available wall space, allowing room for doors and windows.
- Cut batten timber to create shelf supports and fix them horizontally to the shed wall using screws and wall plugs at desired heights, checking each with a spirit level.
- Rest plywood shelves on the battens and secure with additional screws from above.
- Add extra shelves as needed, leaving space below for bulkier items like compost bags or watering cans.
Classic Potting Bench Construction
Materials Needed:
- Treated timber (for frame): 50mm x 50mm lengths
- Plywood or slatted timber (for worktop)
- Screws, drill, saw, sandpaper
- Lining material (optional: galvanised metal sheet or old lino offcut)
Instructions:
- Construct a simple rectangular frame for the base (approx. 1m high x 1.2m wide x 0.6m deep).
- Add legs at each corner and cross-brace for stability.
- Fix your chosen worktop onto the frame. Sand any rough edges.
- If desired, line the top with waterproof material for easier clean-up after potting up seedlings.
- Add a lower shelf using more battens or plywood for storing compost and pots.
Vertical Storage: Maximising Wall Space in Small Sheds
Materials Needed:
- Pegboard panels or wooden battens for tool hanging rails
- Cup hooks, S-hooks, or nails/screws for hanging tools and accessories
- Screws/drill/tape measure/spirit level
- Offcuts of plywood or sturdy cardboard (for custom seed boxes)
Instructions:
- Select a free wall area inside your shed—preferably near the door for easy access.
- Affix pegboard or battens securely using screws. Use a spirit level to keep everything straight.
- Add hooks at regular intervals for hanging hand tools, trowels, and even string rolls.
- Create labelled seed boxes by folding sturdy cardboard or assembling small plywood trays; label them by month or crop type for easy organisation.
- You can also attach narrow shelves above head height for items used less often—think bird netting or spare canes.
These bespoke DIY organisers will not only bring order to your allotment shed but also make every visit more efficient—leaving you more time to enjoy nurturing your plot.
5. Maximising Space: Clever Solutions for Compact Sheds
Allotment sheds across the UK are often quaint and compact, which means every square inch must be used efficiently to keep tools, seeds, and equipment tidy. Here are practical strategies to make the most of limited shed space while maintaining a bespoke and organised environment.
Embrace Vertical Storage with Hanging Racks
One of the simplest ways to free up floor space is by utilising your shed’s walls and doors. Installing sturdy hanging racks allows you to store frequently used tools such as trowels, forks, or secateurs within easy reach. Over-door hooks can accommodate anything from gardening gloves to watering cans, keeping them off the ground and reducing clutter.
Stackable Crates for Flexible Storage
Stackable crates are a classic British solution for versatile storage. Choose robust, weather-resistant crates that can be easily rearranged or labelled according to the season or task. These crates can house everything from seed packets and pots to compost bags and hand tools. Their modular nature means you can quickly reconfigure your storage as your allotment needs evolve throughout the year.
Pegboards: Customisable Organisation at Its Best
Pegboards are an excellent investment for any DIY shed project. Fixed securely to a wall, they offer a flexible platform for hanging everything from spades to scissors using simple pegs or hooks. You can design the layout around your own habits—grouping items by function or frequency of use—and even outline tool shapes on the board for instant visual organisation. This approach not only maximises space but also helps keep your shed tidy after busy days on the plot.
Smart Shelving and Foldaway Surfaces
Consider installing slimline shelving high up on walls for storing less frequently used items like spare pots or reference books. Additionally, fold-down benches or work surfaces can provide valuable workspace when needed and tuck away neatly when not in use—a practical touch for smaller sheds where flexibility is paramount.
By integrating these clever storage solutions into your DIY projects, you’ll transform even the cosiest of allotment sheds into an efficient, bespoke hub that supports both productivity and pleasure on your plot.
6. Finishing Touches: Weatherproofing and British Style
Once your bespoke organisers and storage solutions are installed in your allotment shed, it’s essential to ensure they stand the test of time against the ever-changing British weather. Protecting your handiwork begins with selecting suitable finishes that both shield and celebrate your creations. For timber projects, a traditional favourite is linseed oil—easy to apply and renowned for enhancing the natural grain while offering a robust moisture barrier. Alternatively, chalk paint provides a classic, heritage-inspired look; its matte finish can evoke rustic charm while providing an extra layer of protection when sealed with wax or lacquer.
Consider the practicalities of your shed environment. Damp and humidity are common culprits in UK gardens, so pay special attention to joints, corners, and any surfaces likely to collect condensation. Use exterior-grade wood treatments or varnishes where appropriate, and don’t neglect hardware—galvanised screws and hinges resist rust far better than standard options.
For a touch of individuality, embrace quintessentially British motifs. Hand-paint labels on drawers using a steady hand or stencils, or select subtle pastel hues reminiscent of country cottages. Repurposed handles from vintage markets add character and sustainability to your DIY project. With thoughtful finishing touches that blend durability with personal flair, you’ll ensure your custom storage not only endures but also adds unmistakable British style to your allotment shed.
7. Conclusion: Enjoying a More Productive Allotment Shed
Embracing DIY storage solutions within your allotment shed brings an array of benefits that extend far beyond tidiness. By designing and building bespoke organisers, you tailor every nook to suit your gardening style, tool collection, and seasonal routines. This level of customisation not only maximises available space but also ensures that everything has its place, reducing clutter and saving precious time during busy planting or harvesting periods. An organised shed fosters efficiency, allowing you to focus on the pleasure of tending your plot rather than searching for misplaced tools or supplies. Furthermore, the process of crafting your own storage encourages creativity and resourcefulness, making the shed a true reflection of your personality and needs. Ultimately, investing in DIY projects transforms your allotment shed into a more enjoyable and productive hub, supporting a smoother workflow and enhancing the overall satisfaction you derive from your gardening endeavours.