Introduction to Seed Starting in the UK
Embarking on the journey of seed starting is a cherished tradition for many British gardeners, woven deeply into our culture of nurturing gardens both great and small. With the UK’s famously unpredictable weather—where a sunny spell can swiftly turn to drizzle, and late frosts are always lurking around the corner—getting a head start on the growing season is not only wise but often essential. Starting seeds indoors, whether in a cosy kitchen windowsill, a classic Victorian greenhouse, or a modern polytunnel, gives us the precious advantage of controlling temperature and moisture, shielding delicate seedlings from cold snaps and persistent rain. This approach has long been favoured by seasoned allotmenteers and home growers alike, allowing us to make the most of every precious daylight hour as spring approaches. By sowing under cover, we can nurture everything from heritage tomatoes to fragrant sweet peas well before they’d stand a chance outside, ensuring robust plants ready to thrive once the risk of frost has truly passed. In this guide, we’ll explore how to tailor your seed starting efforts to the unique rhythms of the British climate, blending time-honoured techniques with practical tips for success under glass or plastic. Whether you’re new to gardening or carrying on family traditions, understanding the local context is key—and with a little planning, you’ll soon be reaping the rewards come summer.
2. Choosing the Right Seeds and Planning the Season
One of the most crucial steps in starting seeds indoors, especially here in the UK, is selecting the right varieties and organising your sowing schedule to suit our unique climate. While it might be tempting to try exotic types, it pays dividends to focus on seeds that are proven performers in British greenhouses and polytunnels. Our weather can be notoriously unpredictable—one minute you’re basking in spring sunshine, the next you’re dodging a late frost. With decades of gardening experience behind me, I’ve learned that planning is everything.
Seed Selection: Focusing on Success
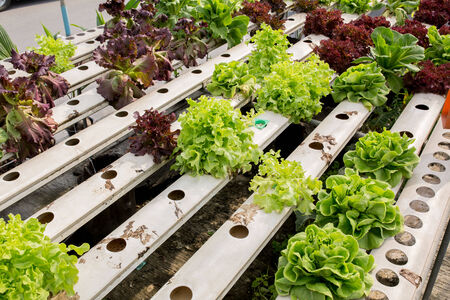
When picking seeds for indoor sowing, look for varieties marked as ‘suitable for greenhouse’ or ‘polytunnel cultivation’. These will thrive with the extra warmth and protection. Tomatoes, cucumbers, peppers, aubergines, lettuce, and early brassicas like cabbage or kale are all safe bets. Don’t overlook heritage or British-bred varieties—they often cope better with our light levels and variable temperatures.
Popular Crops for British Greenhouses & Polytunnels
| Crop | Recommended Varieties | Notes |
|---|---|---|
| Tomato | ‘Ailsa Craig’, ‘Gardener’s Delight’ | Reliable, good flavour, suitable for UK light levels |
| Cucumber | ‘Carmen’, ‘Marketmore’ | Tolerates cooler nights, high yields |
| Pepper | ‘California Wonder’, ‘King of the North’ | Performs well in polytunnels |
| Lettuce | ‘Little Gem’, ‘Salad Bowl’ | Quick cropping, handles temperature swings |
Planning Your Sowing Times: The British Calendar’s Rhythm
The key to success is understanding when to start your seeds. In Britain, daylight length and temperature play a big role. Too early and your seedlings risk becoming leggy or stunted; too late and you’ll miss out on precious growing time. Here’s a general guideline based on years of trial and error:
| Crop | Sow Indoors From | Transplant To Greenhouse/Polytunnel From |
|---|---|---|
| Tomato | Late February – March | Late April – May (after frost risk) |
| Cucumber | March – April | May (when nights are reliably above 10°C) |
| Pepper/Aubergine | February – March | Late April – May |
| Lettuce & Leafy Greens | All year (for succession) | As soon as space allows; protect from frosts |
A Few Words of Wisdom from Experience
If you’re new to this, keep things simple at first. Grow what you enjoy eating, but don’t bite off more than you can chew—literally! Keep notes each season: what did well, what struggled. Over time, you’ll develop a planting rhythm that fits your own patch of Britain perfectly.

3. Setting Up Your Indoor Growing Space
If you’re serious about starting seeds indoors here in Britain, the foundation of your success is a well-prepared greenhouse or polytunnel. Our changeable weather and often chilly springs mean that a bit of preparation goes a long way—think of it as setting up a comfortable home for your young seedlings, shielding them from the worst of the elements while providing just what they need to thrive.
Heating: Keeping the Chill at Bay
British springs can be unpredictable, with night-time frosts lingering well into April in many regions. To give your seeds the best start, consider whether supplemental heating is necessary. For those in the milder South, a cold frame or unheated greenhouse might suffice, but further north or during particularly cold spells, a small electric heater or even paraffin heaters can keep temperatures above the critical 10°C mark. Always use a reliable thermometer to monitor temperatures—seedlings are fussy little things and don’t like to be too cold or too hot.
Ventilation: Fresh Air Matters
Good airflow is crucial to prevent moulds and damping-off diseases, which can wipe out trays of seedlings overnight. Make use of roof vents and louvre windows in your greenhouse; if you’re using a polytunnel, roll up the sides on warmer days. Even on cooler days, opening up for an hour or two helps keep air fresh. Remember, stagnant air is as much an enemy as the frost—don’t be afraid to let your growing space breathe.
Choosing Containers: Traditional Trays vs Modern Modules
Once upon a time, everyone used seed trays filled with compost, but nowadays there’s more choice than ever. Cell trays (modules) allow for individual root development and make pricking out less stressful for both you and your seedlings. Recycled yoghurt pots and loo roll tubes are popular amongst thrifty gardeners—just make sure they have drainage holes. Whatever you choose, cleanliness is key; give everything a good wash before sowing to avoid lurking diseases.
Selecting Compost: The British Way
A quality seed compost is light and free-draining yet able to retain enough moisture for germinating seeds. Many British gardeners swear by John Innes Seed Compost—a classic formula that has stood the test of time—but peat-free options are now widely available and perform admirably with a little extra care. Avoid using garden soil indoors; it’s heavy and often harbours pests. If you’re after finer results, sieve your compost before filling containers, removing any lumps or large bits that could hinder delicate roots.
A Few Words from Experience
There’s no need for fancy gadgets—just practical know-how and attention to detail will see you right. Tidy benches, organised trays, and regular checks for temperature and moisture will reward you with strong seedlings ready for planting out when the British weather finally behaves itself. As always, patience is the gardener’s greatest virtue—give your seeds what they need, and they’ll repay you tenfold come summer.
4. The Seed Sowing Process Step-by-Step
Starting seeds indoors is a cherished tradition in many British households, not only for gaining an early start on the growing season but also for nurturing a deep connection to the land—whether you’re using a classic greenhouse or a modern polytunnel. Let’s walk through the process step-by-step, with practical advice tailored to British conditions.
Choosing Containers and Compost
The first decision is your container. Traditionalists may favour seed trays or old yoghurt pots (with drainage holes poked in), while modern gardeners often opt for biodegradable pots or root trainers. For compost, always select a good-quality, peat-free seed sowing compost. These blends are lighter and finer than multi-purpose compost, making them ideal for delicate seedlings.
| Container Type | Best Use | British Tip |
|---|---|---|
| Seed Trays | General sowing, especially for small seeds | Place trays on capillary matting to maintain even moisture |
| Modules/Cells | Larger seeds or individual plants (e.g., beans) | Label each cell for easy identification later on |
| Biodegradable Pots | Direct planting out; less root disturbance | Avoid overwatering as these retain moisture longer |
Sowing Techniques: Depth and Spacing
The back of the seed packet usually offers guidance on sowing depth—follow it religiously. As a rule of thumb, sow seeds at a depth roughly equal to twice their diameter. Overcrowding is a common pitfall; resist the urge to sprinkle too thickly as seedlings need space for air circulation. Gently press down the compost after sowing to ensure good contact between seed and soil.
Typical Sowing Depths for Common British Crops
| Crop | Sowing Depth (cm) | Notes |
|---|---|---|
| Lettuce | 0.5 | Needs light to germinate – barely cover with compost |
| Toms (Tomatoes) | 1.0 | Keep warm (18-21°C) until germination appears |
| Runner Beans | 3.0-5.0 | Sow individually in modules for best results |
| Cabbage Family | 1.0-1.5 | Sow thinly to prevent damping off disease |
Watering Routines and Humidity Management
The fickle British weather makes humidity management indoors essential. Water gently after sowing—ideally from below by standing trays in water until the surface darkens, then draining off excess. This prevents disturbing seeds and reduces fungal risk. Cover trays with clear lids or cling film to retain humidity, but remove covers once seedlings appear to avoid mould.
Key Watering Tips for British Gardeners:
- Mornings are best for watering—reduces overnight dampness and fungal risk.
- If using hard tap water, allow it to stand overnight so chlorine can dissipate.
- A fine rose on your watering can gives gentle coverage without washing away seeds.
- If compost dries out quickly in greenhouses during sunny spells, consider misting lightly in addition to bottom watering.
Final Thoughts: A Patient Touch Goes Far
The secret ingredient in every successful seedling is patience—a lesson passed down through generations of British gardeners. Don’t be tempted to prod or poke at seeds before they’re ready; keep them snug, moist, and well-labelled. With practice and care, you’ll soon see those first green shoots—a sure sign that spring is truly on its way inside your greenhouse or polytunnel.
5. Caring for Seedlings and Common Troubleshooting
Once your seeds have germinated, the real work begins. Nurturing young seedlings in a British greenhouse or polytunnel is both an art and a science, requiring a keen eye, patience, and timely intervention. Here’s my seasoned advice on keeping your seedlings thriving, as well as recognising and tackling common UK-specific issues.
Watering Wisely
Overwatering is a classic pitfall, particularly in our unpredictable British climate. Seedlings need consistent moisture but detest soggy roots. Use tepid water—cold can shock them—and aim to water from below if possible, letting the compost soak up what’s needed. In drier spells, check daily; in damp weather, you may only need to water every few days. Always ensure good drainage to prevent root rot.
Light and Temperature Balance
Seedlings require plenty of light to grow sturdy rather than leggy. If natural sunlight is scarce—which it often is in early spring—consider supplementing with grow lights for 12-14 hours a day. Keep temperatures steady: most seedlings thrive between 15-20°C. Watch out for sudden frosts or heat spikes in polytunnels; a simple thermometer and fleece covers are invaluable tools.
Pest Patrol: UK Culprits
Fungus Gnats & Sciarid Flies
Damp compost attracts these tiny pests. Reduce their numbers by allowing the surface to dry between waterings and using sticky traps.
Aphids & Slugs
Aphids sneak into greenhouses through open vents, while slugs find their way under doors and cracks. Inspect leaves frequently, remove pests by hand, or encourage natural predators like ladybirds. For slugs, copper tape barriers work wonders around pots.
Disease Watch: British Favourites
Damping Off
This fungal disease causes young stems to collapse at soil level—a heartbreakingly common problem in damp British springs. Avoid overcrowding seedlings, ensure good airflow, and use sterile seed compost to prevent outbreaks.
Mildew & Botrytis
High humidity is the culprit here. Open vents during mild days to increase ventilation and avoid overhead watering if possible.
Weather Woes
Sudden cold snaps or prolonged grey spells can stall growth or kill tender seedlings outright. Keep fleece handy for chilly nights and invest in a small greenhouse heater if you’re growing anything particularly delicate. On the flip side, don’t let seedlings bake on rare sunny days—shade them with horticultural fleece or newspaper if necessary.
Regular Inspections: Your Best Defence
The most effective strategy is vigilance. Take a stroll through your greenhouse or polytunnel each day—cup of tea in hand—and look closely for any changes: yellowing leaves, spots, moulds or signs of munching pests. Early intervention makes all the difference and will help ensure your seedlings grow up strong and healthy, ready for life outdoors when the time comes.
6. Hardening Off and Transplanting Outdoors
Once your seedlings have flourished in the protected environment of your greenhouse or polytunnel, it’s tempting to whisk them straight out into the garden at the first sign of sunshine. However, the great British outdoors is full of surprises—be it a late frost or a blustery wind. To give your young plants their best start, hardening off is an essential step, especially here in the UK where spring weather can be rather fickle.
What Is Hardening Off?
Hardening off simply means acclimatising your tender young plants to outdoor conditions gradually, so they don’t get shocked by lower temperatures, stronger winds, or direct sunlight. This process typically takes about 7 to 14 days and makes all the difference between robust plants and those that struggle to establish once transplanted.
Step-by-Step Guide to Hardening Off in Britain
Step 1: Start Slowly
About two weeks before you plan to transplant, begin by placing your trays or pots outside during the day in a sheltered spot—somewhere out of direct sun and away from cold winds. Bring them back indoors at night to avoid chilly temperatures.
Step 2: Increase Exposure Gradually
Over the following days, leave your plants outside for longer periods and gradually move them into sunnier positions. After about a week, if there’s no threat of frost, you can start leaving them out overnight. If a cold snap is forecast (which happens more often than we’d like), pop them back under cover just to be safe.
Step 3: Reduce Watering
During this period, slightly reduce watering to encourage your plants’ roots to seek out moisture and strengthen themselves for life outdoors. Don’t let them dry out completely—just avoid keeping them too pampered!
Transplanting Into the Garden or Allotment
When your plants are well hardened off and the soil has warmed up (usually late spring in most parts of Britain), it’s time for planting out. Choose a calm, overcast day if possible—it’s less stressful for young transplants than blazing sun or strong winds. Gently remove each plant from its pot, taking care not to disturb the roots more than necessary. Space according to each plant’s needs, water well after planting, and keep an eye on slugs and snails—these British garden pests love fresh young growth.
A Final Word from Experience
The extra effort spent hardening off pays dividends throughout the growing season. In my years of tending plots from Yorkshire allotments to Cornish cottage gardens, I’ve learned that patience in this stage leads to sturdier, healthier crops. Remember—nature doesn’t rush, and neither should we if we want our seedlings to thrive in the unpredictable British climate.
7. Local Tips, Resources and Next Steps
A Collection of Tried-and-Tested Wisdom
After years of pottering about with seed trays and compost, there’s no substitute for a bit of old-fashioned know-how. For example, try sowing in recycled yoghurt pots or mushroom trays—just remember to poke drainage holes! Many seasoned British gardeners swear by starting sweet peas in root trainers and keeping brassicas under mesh from day one to outwit pigeons and cabbage whites. Pay close attention to your local weather: even in a heated greenhouse, a cold snap can catch you out, so keep horticultural fleece handy for those frosty nights.
Suggested Reading for British Growers
If you want to dive deeper, the Royal Horticultural Society (RHS) offers superb guides on seed sowing and propagation, tailored for our unique climate. Books such as “The Greenhouse Gardener’s Manual” by Roger Marshall and “The Polytunnel Book” by Joyce Russell are packed with practical advice specific to UK conditions. Don’t overlook monthly columns in magazines like “Gardeners’ World” or “The English Garden,” which offer timely reminders and troubleshooting tips.
Sources for Local Seeds
Seek out reputable British seed suppliers such as Thompson & Morgan, Chiltern Seeds, and Real Seeds. These companies offer varieties bred for British conditions, increasing your chances of success. Community seed swaps—often organised at allotments or village halls—are also brilliant places to pick up heritage varieties and share surplus packets.
Engaging with the British Gardening Community
Don’t be shy about joining your local allotment society or gardening club; these groups are treasure troves of regional wisdom and camaraderie. Online forums like the RHS Community or the UK-based Grow Your Own Forum are lively spaces where growers exchange tips and troubleshoot problems together. Social media groups dedicated to greenhouse or polytunnel gardening can connect you with neighbours who have faced—and solved—the same challenges.
Your Next Steps
As you pack away your seed packets and tidy the greenhouse benches, remember that gardening is a journey as much as a destination. Keep notes on what works (and what doesn’t) in your logbook. Stay curious, keep learning from fellow growers, and above all—enjoy every moment spent nurturing new life from seed in your own corner of Britain. The joy is truly in the growing.